
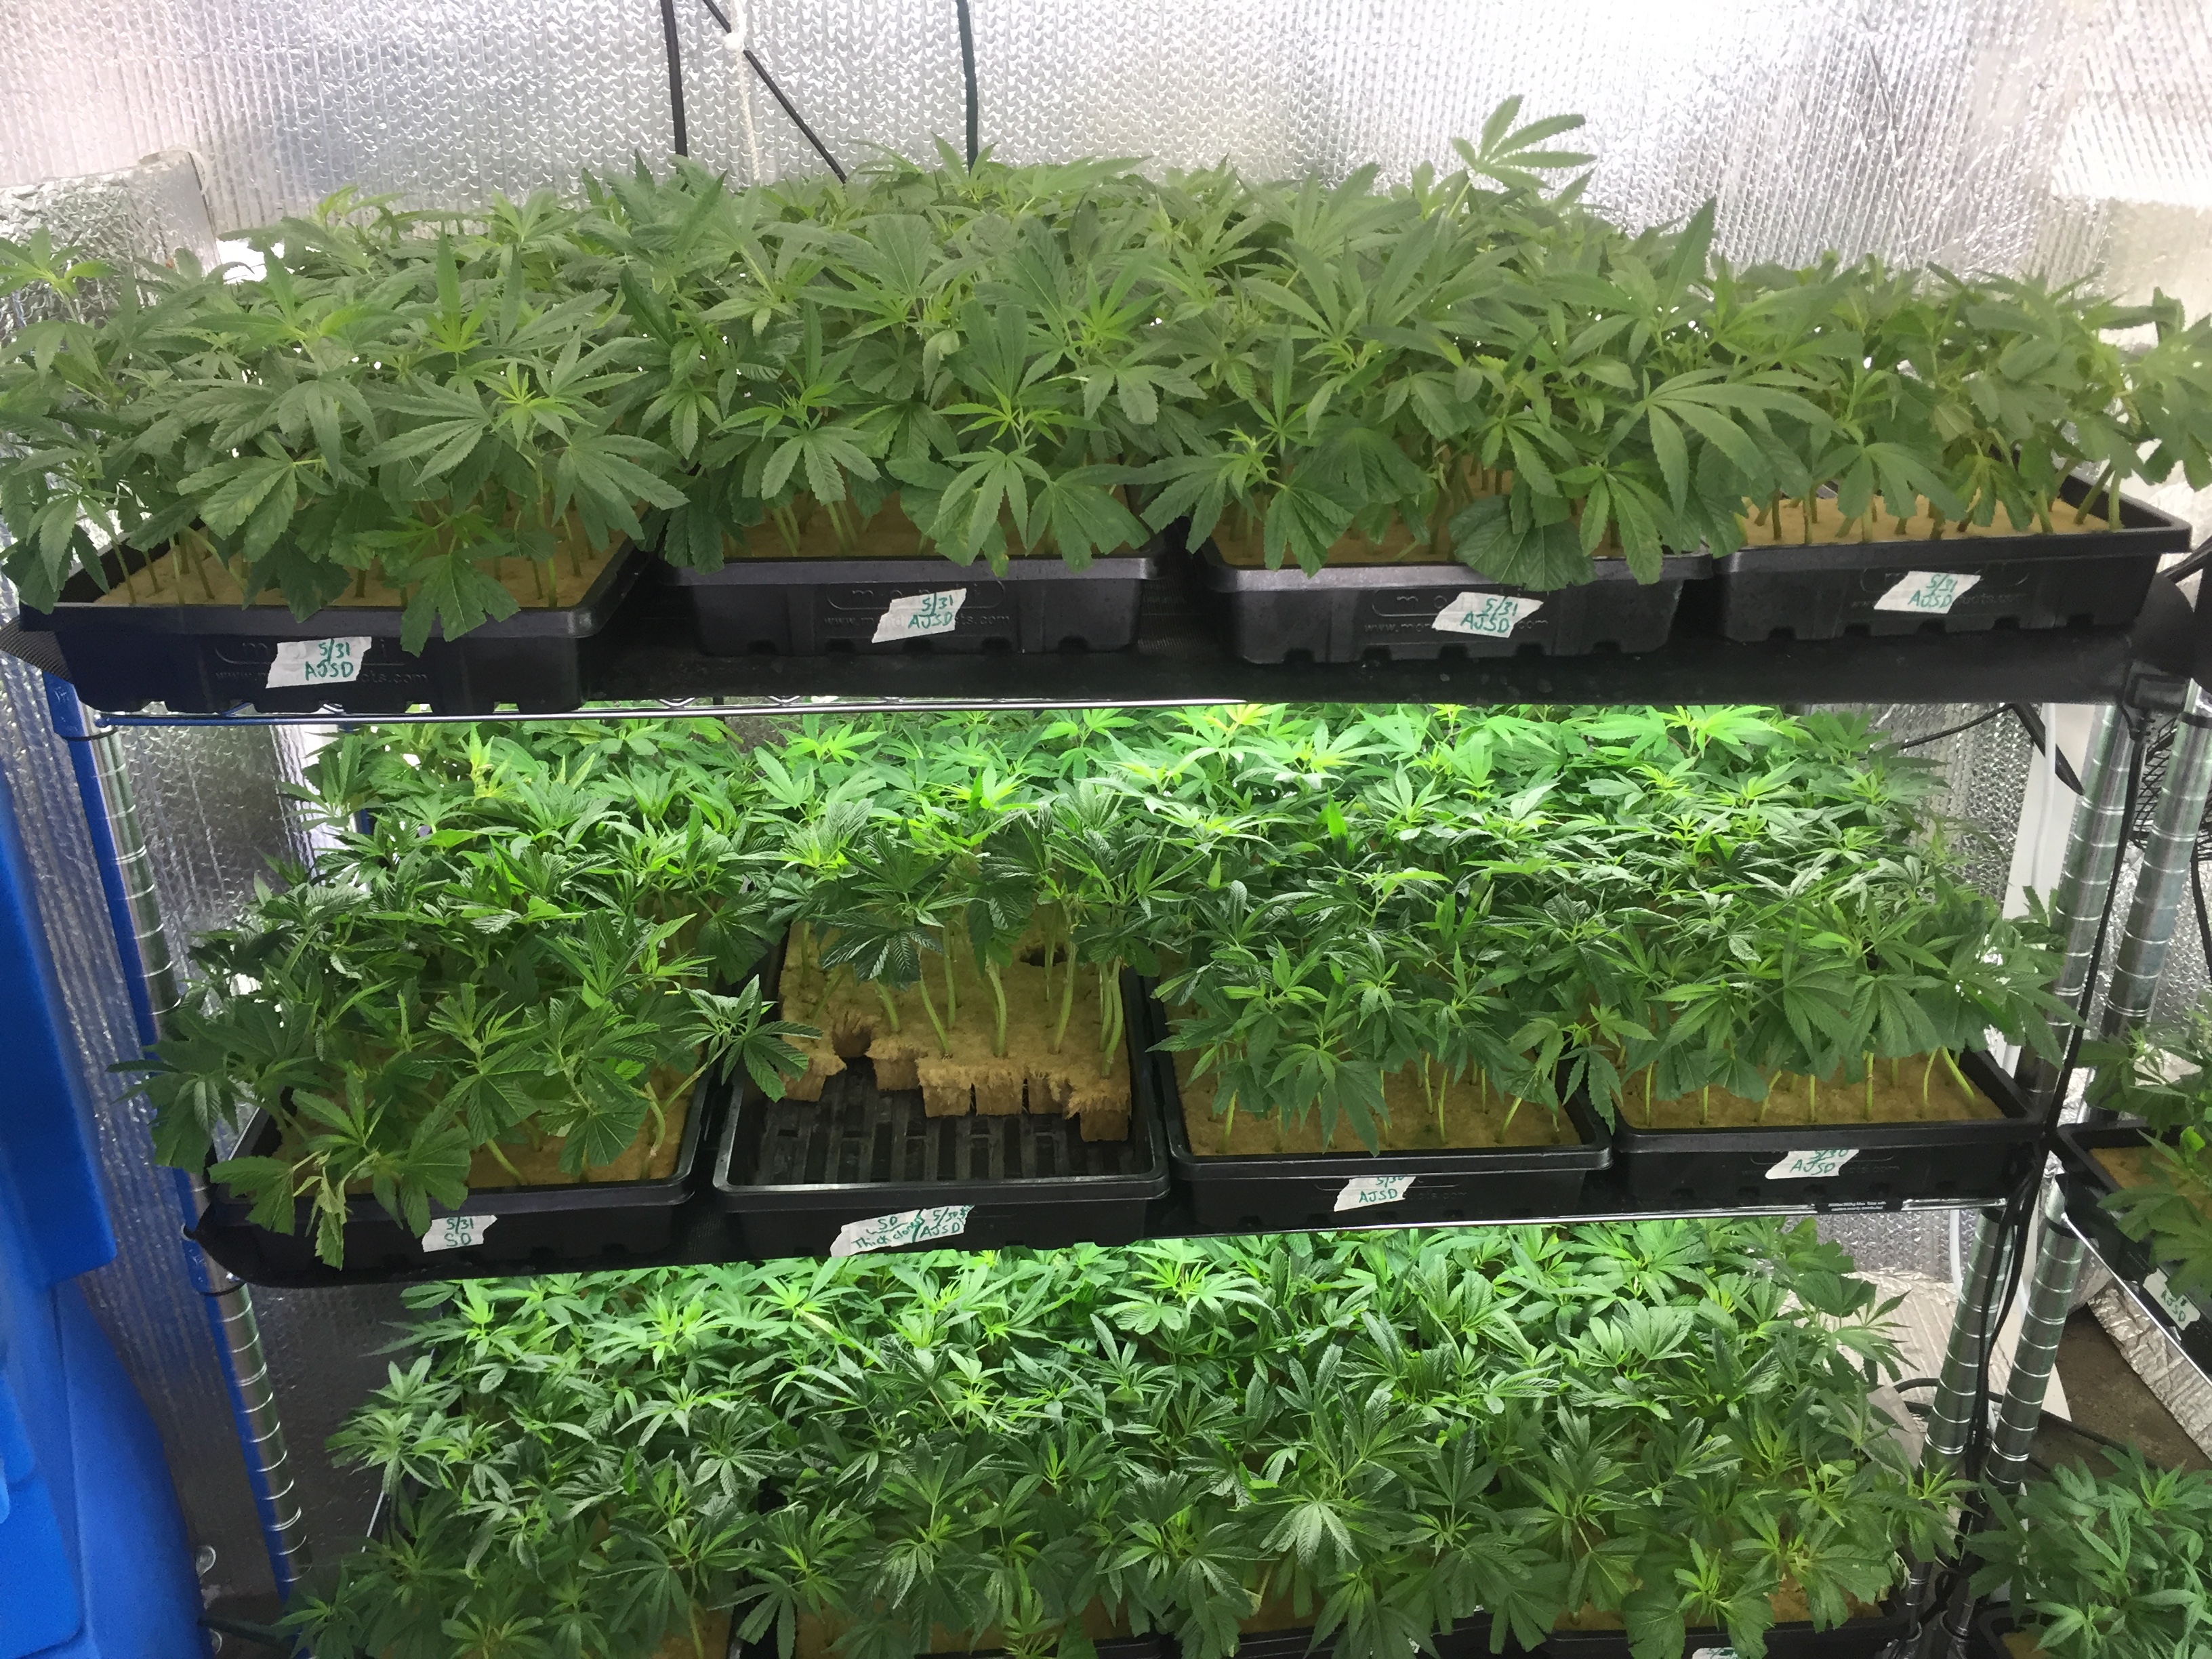
Clones are incredibly important to the facilitation of genetic preservation, but all too often they can also be a source vector for pests and pathogens. Because Strainly‘s goal is to foster the preservation of clean cultivars, we are pleased to have Russell Pace, President of the C.H.A, share his knowledge with our members in this article. Russell will try to cover the main pests and pathogens you should be aware of and also some symptoms associated with those diseases.
First, it’s important to note the subtle differences between clones and seed grown juvenile plants. Clones are taken off a mother plant and seed grown plants are simply propagated from seed. Seed plants are generally much more vigorous than clones and typically have significantly less possibilities of contracting diseases that mother plants might carry. Clearly this is also codependent on the growing room cleanliness, but in general seed starts can be considered healthier with fewer problems. In this article we will be addressing the problems associated with clones, but the same analysis can be applied for seed grown plants as well.
What to Look For
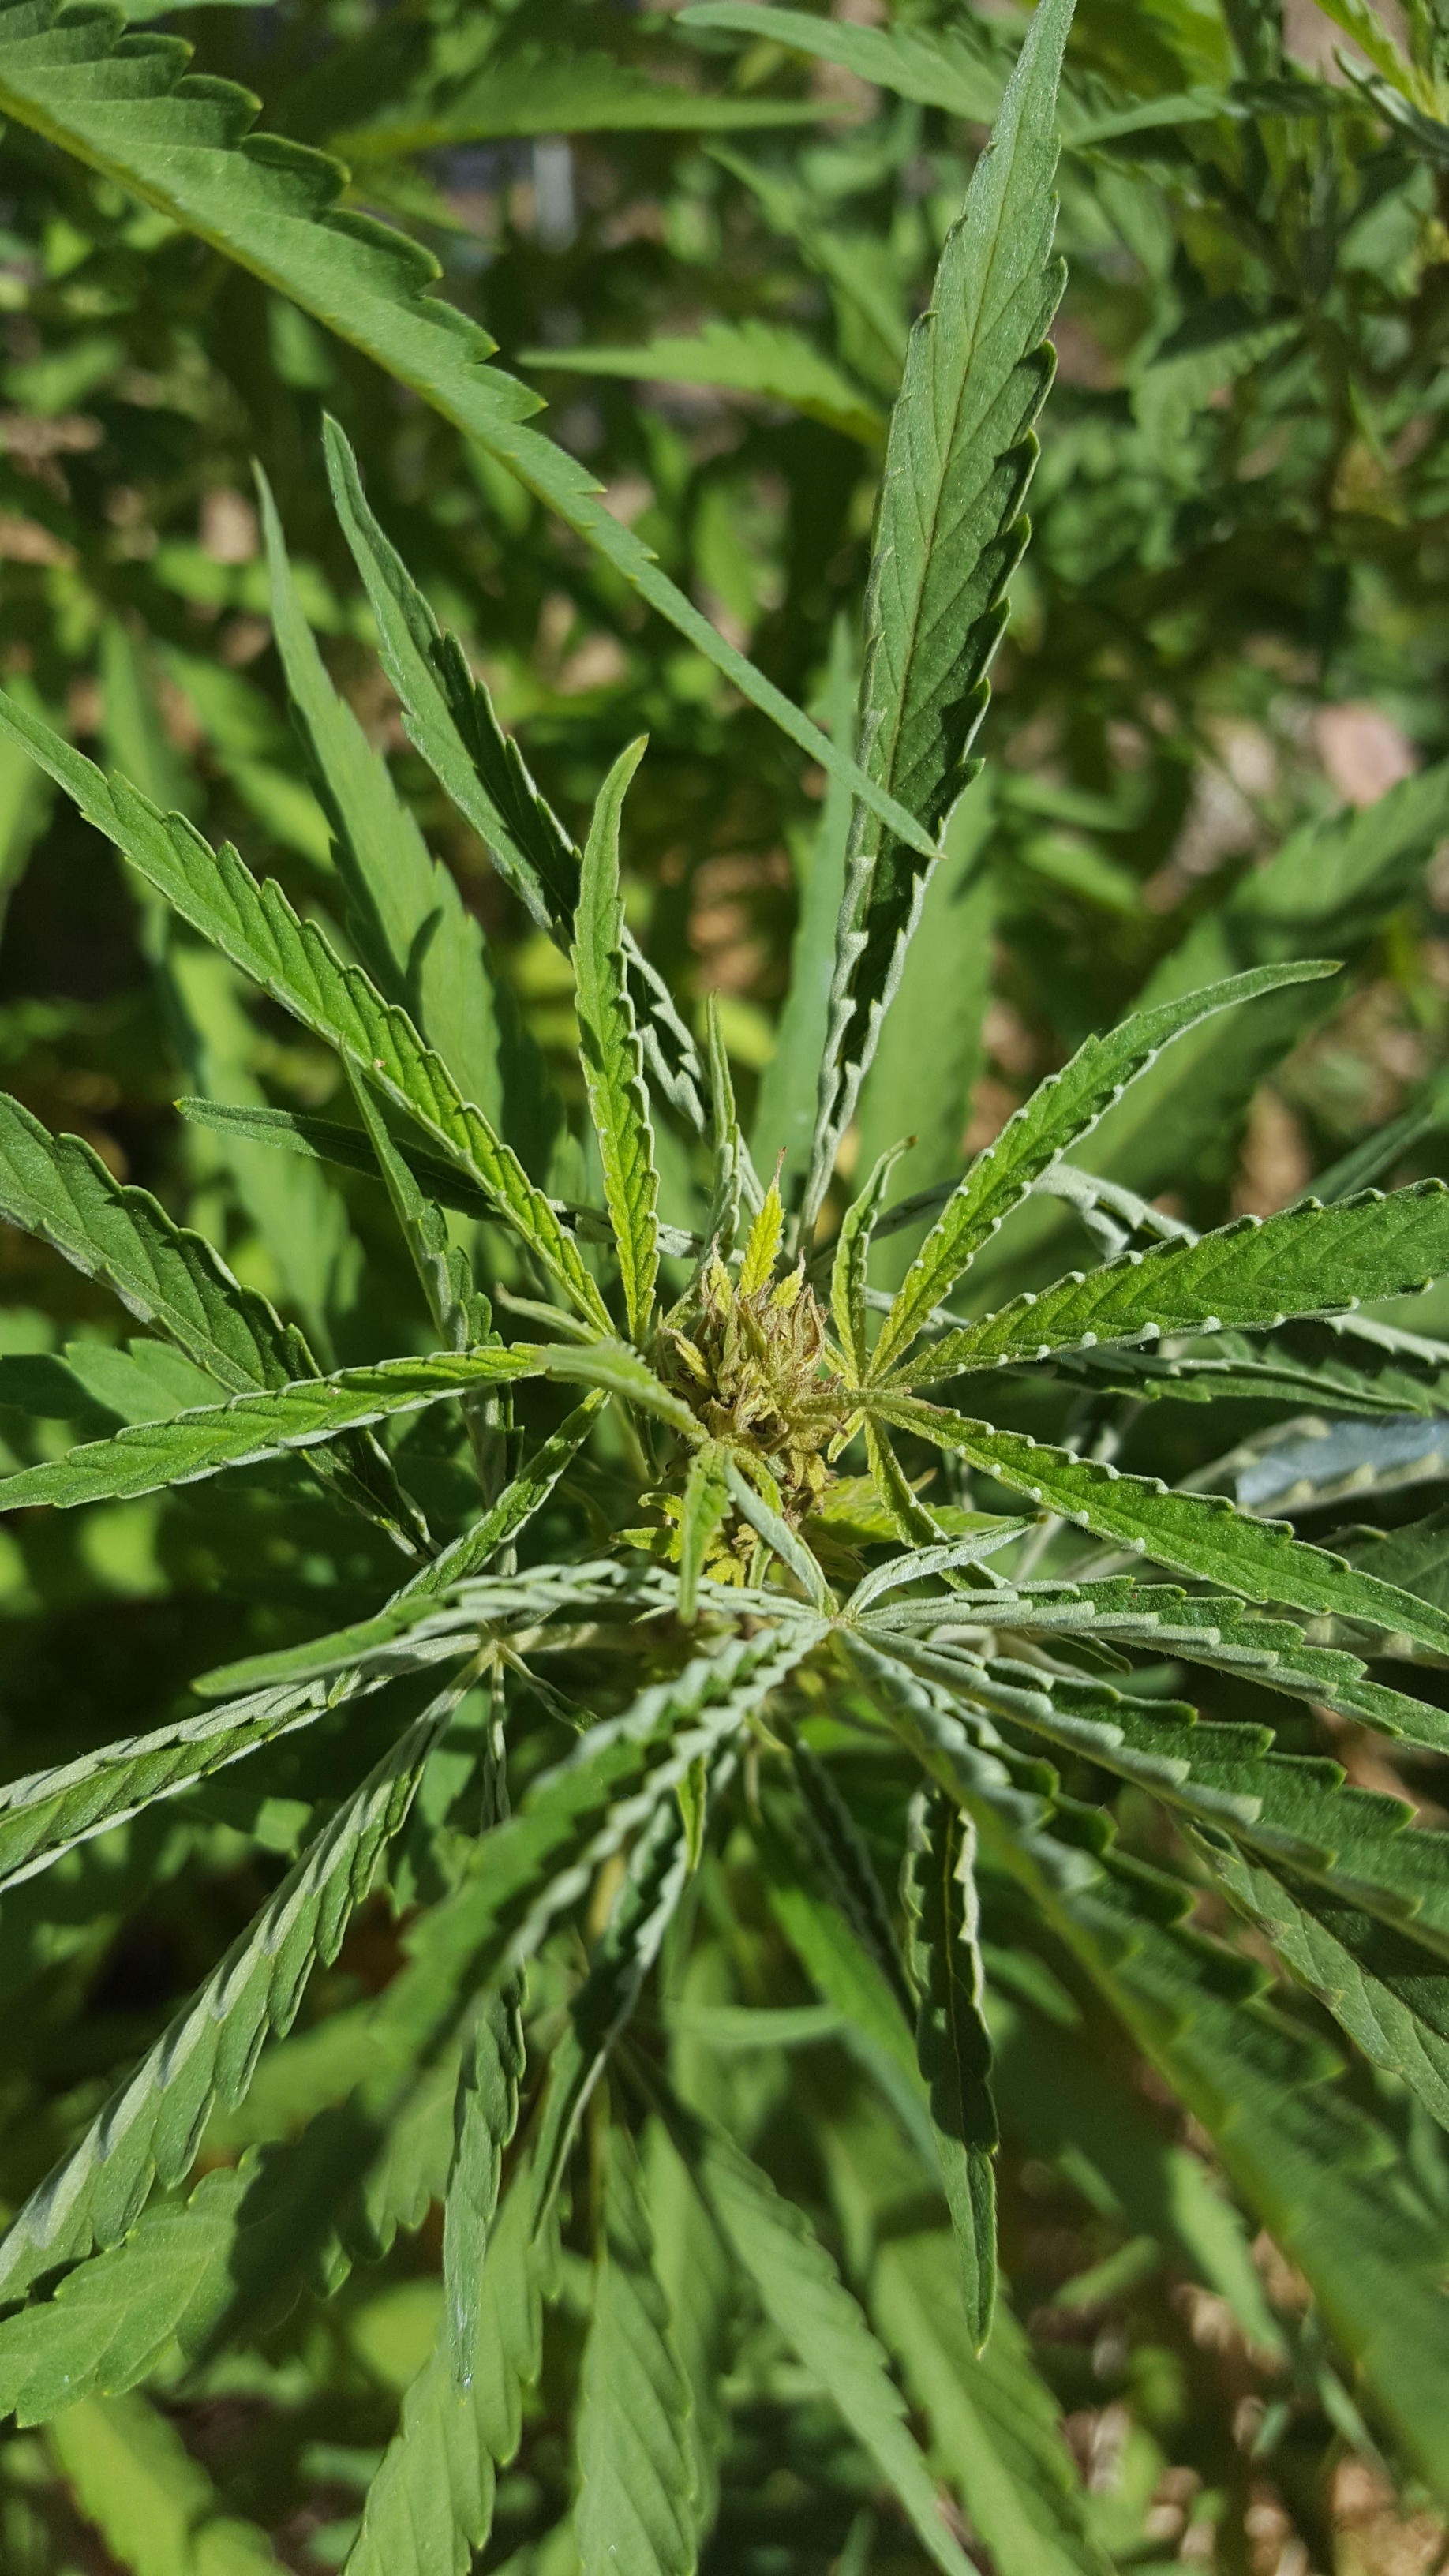
When looking at clones there are two areas to examine, the plants stems/leaves and the plants roots. On the leaf surface you’re looking for signs of pathogens and damage from predators, and the same analysis will be conducted on the roots. Any reputable clone will have roots growing out of the bottom of its media. Seeing the roots is always an important aspect to this assay.
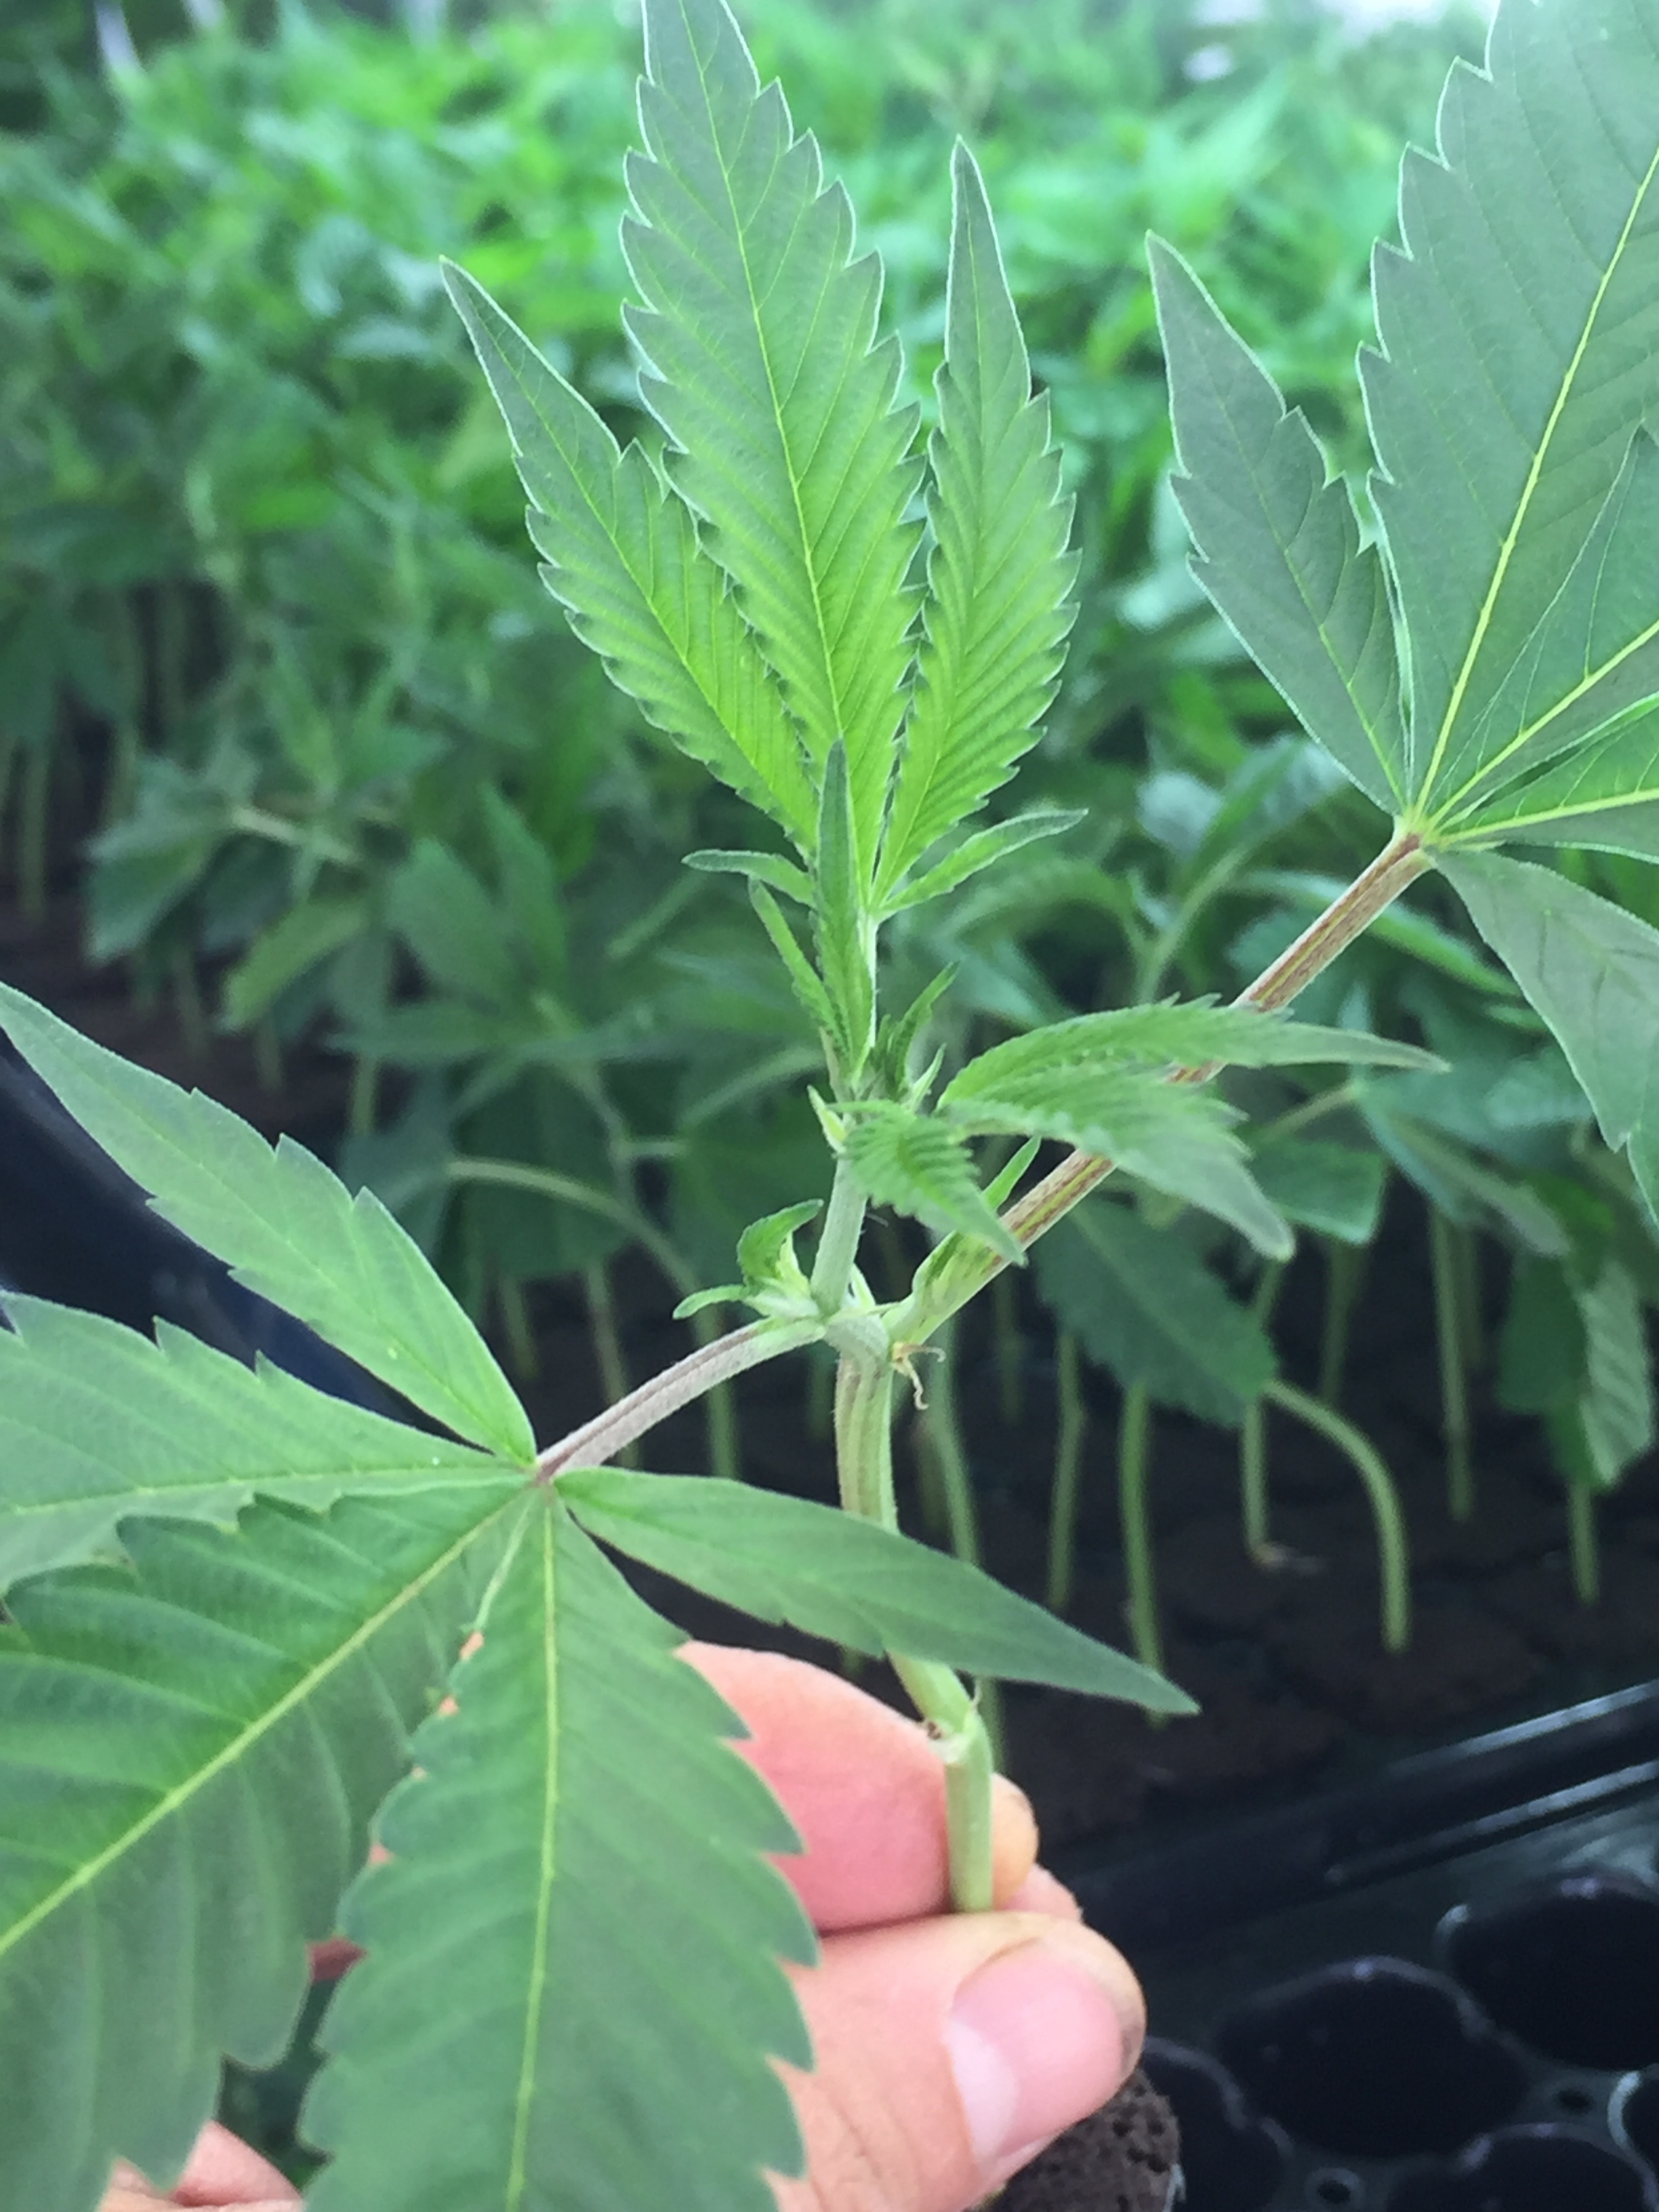
Sometimes you can tug lightly on the stalk and see if it pulls up or out. If it does pull up then that clone is not very well rooted and might be more likely to die in adverse conditions before fully rooted.
Pathogens
When looking for pathogens the most common fungal disease is powdery mildew. It grows on the outside of leaves, forming a white or grayish powder of spores and fungal strands. It’s important to study this pathogen because it is the most ubiquitous disease affecting hemp. Many times growers will spray sulfur and other fungicides that leave a white residue; many times that white residue will be misinterpreted as powdery mildew. The key to identification is to always have a microscope handy. A simple 30X magnification hand lens will suffice for ID. The key is to look for fungal hyphae or strands that rise above off the leaf surface. Fungicide residue is simply “painted” onto the leaf surface, but powdery mildew is actually 3-dimensional and has fungal spores that rise above the leaf surface.
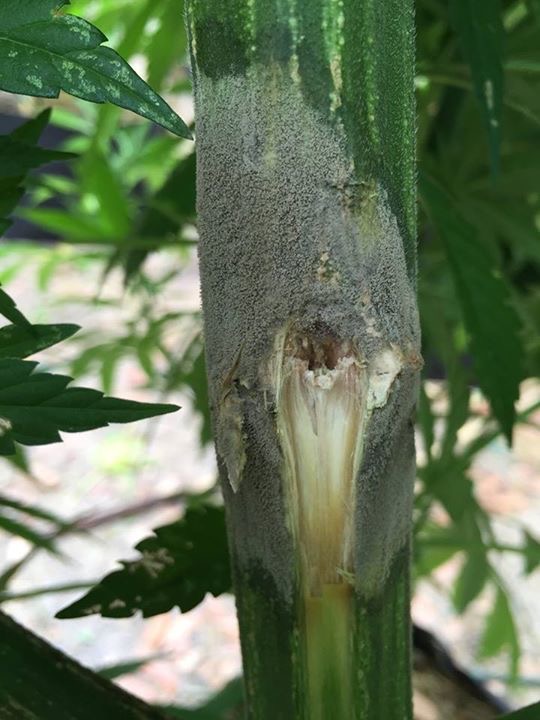
Other plant pathogens like botrytis (grey mold) can occur if the humidity levels are too high and the plants are over crowded. Grey mold has some powdery mildew but typically affects stalks and leaves touching each other. Grey mold is grey to black and can typically be found at the base of the stalk on clones, where high humidity levels and overwatering cause this disease to proliferate. Leaf spot bacterial diseases are appreciably less common and usually not a concern for the home grower. We are studying these though as this industry progresses.
Root pathogens are significantly more common and are definitely very detrimental to the health of clones. Again, it’s important to note that there can be subtle differences between identifying a pathogen and other external factors that affect the appearance of the roots. Ideally, when you buy a clone, the roots will be bright white and look healthy and vigorous. Many times, external conditions change that and can give the roots the appearance of blackened tips or white root with brown edges. Some of these factors would be the heating mat gets too hot, or the clone dries out too much and the exposed roots die back. Sometimes growers over fertilize which can also lead to similar symptoms. These are generally acceptable and overall to do not detract from the health of the clone as long as proper care is taken. However, when root tips die back, that can cause infections to infiltrate those areas, and when the infected region loses its protective outer layer it can expose the inner root to other pathogens. It really all depends on the sterility and cleanliness of the environment the clones are raised in. You have to examine the entirety of the plants health and make your analysis.
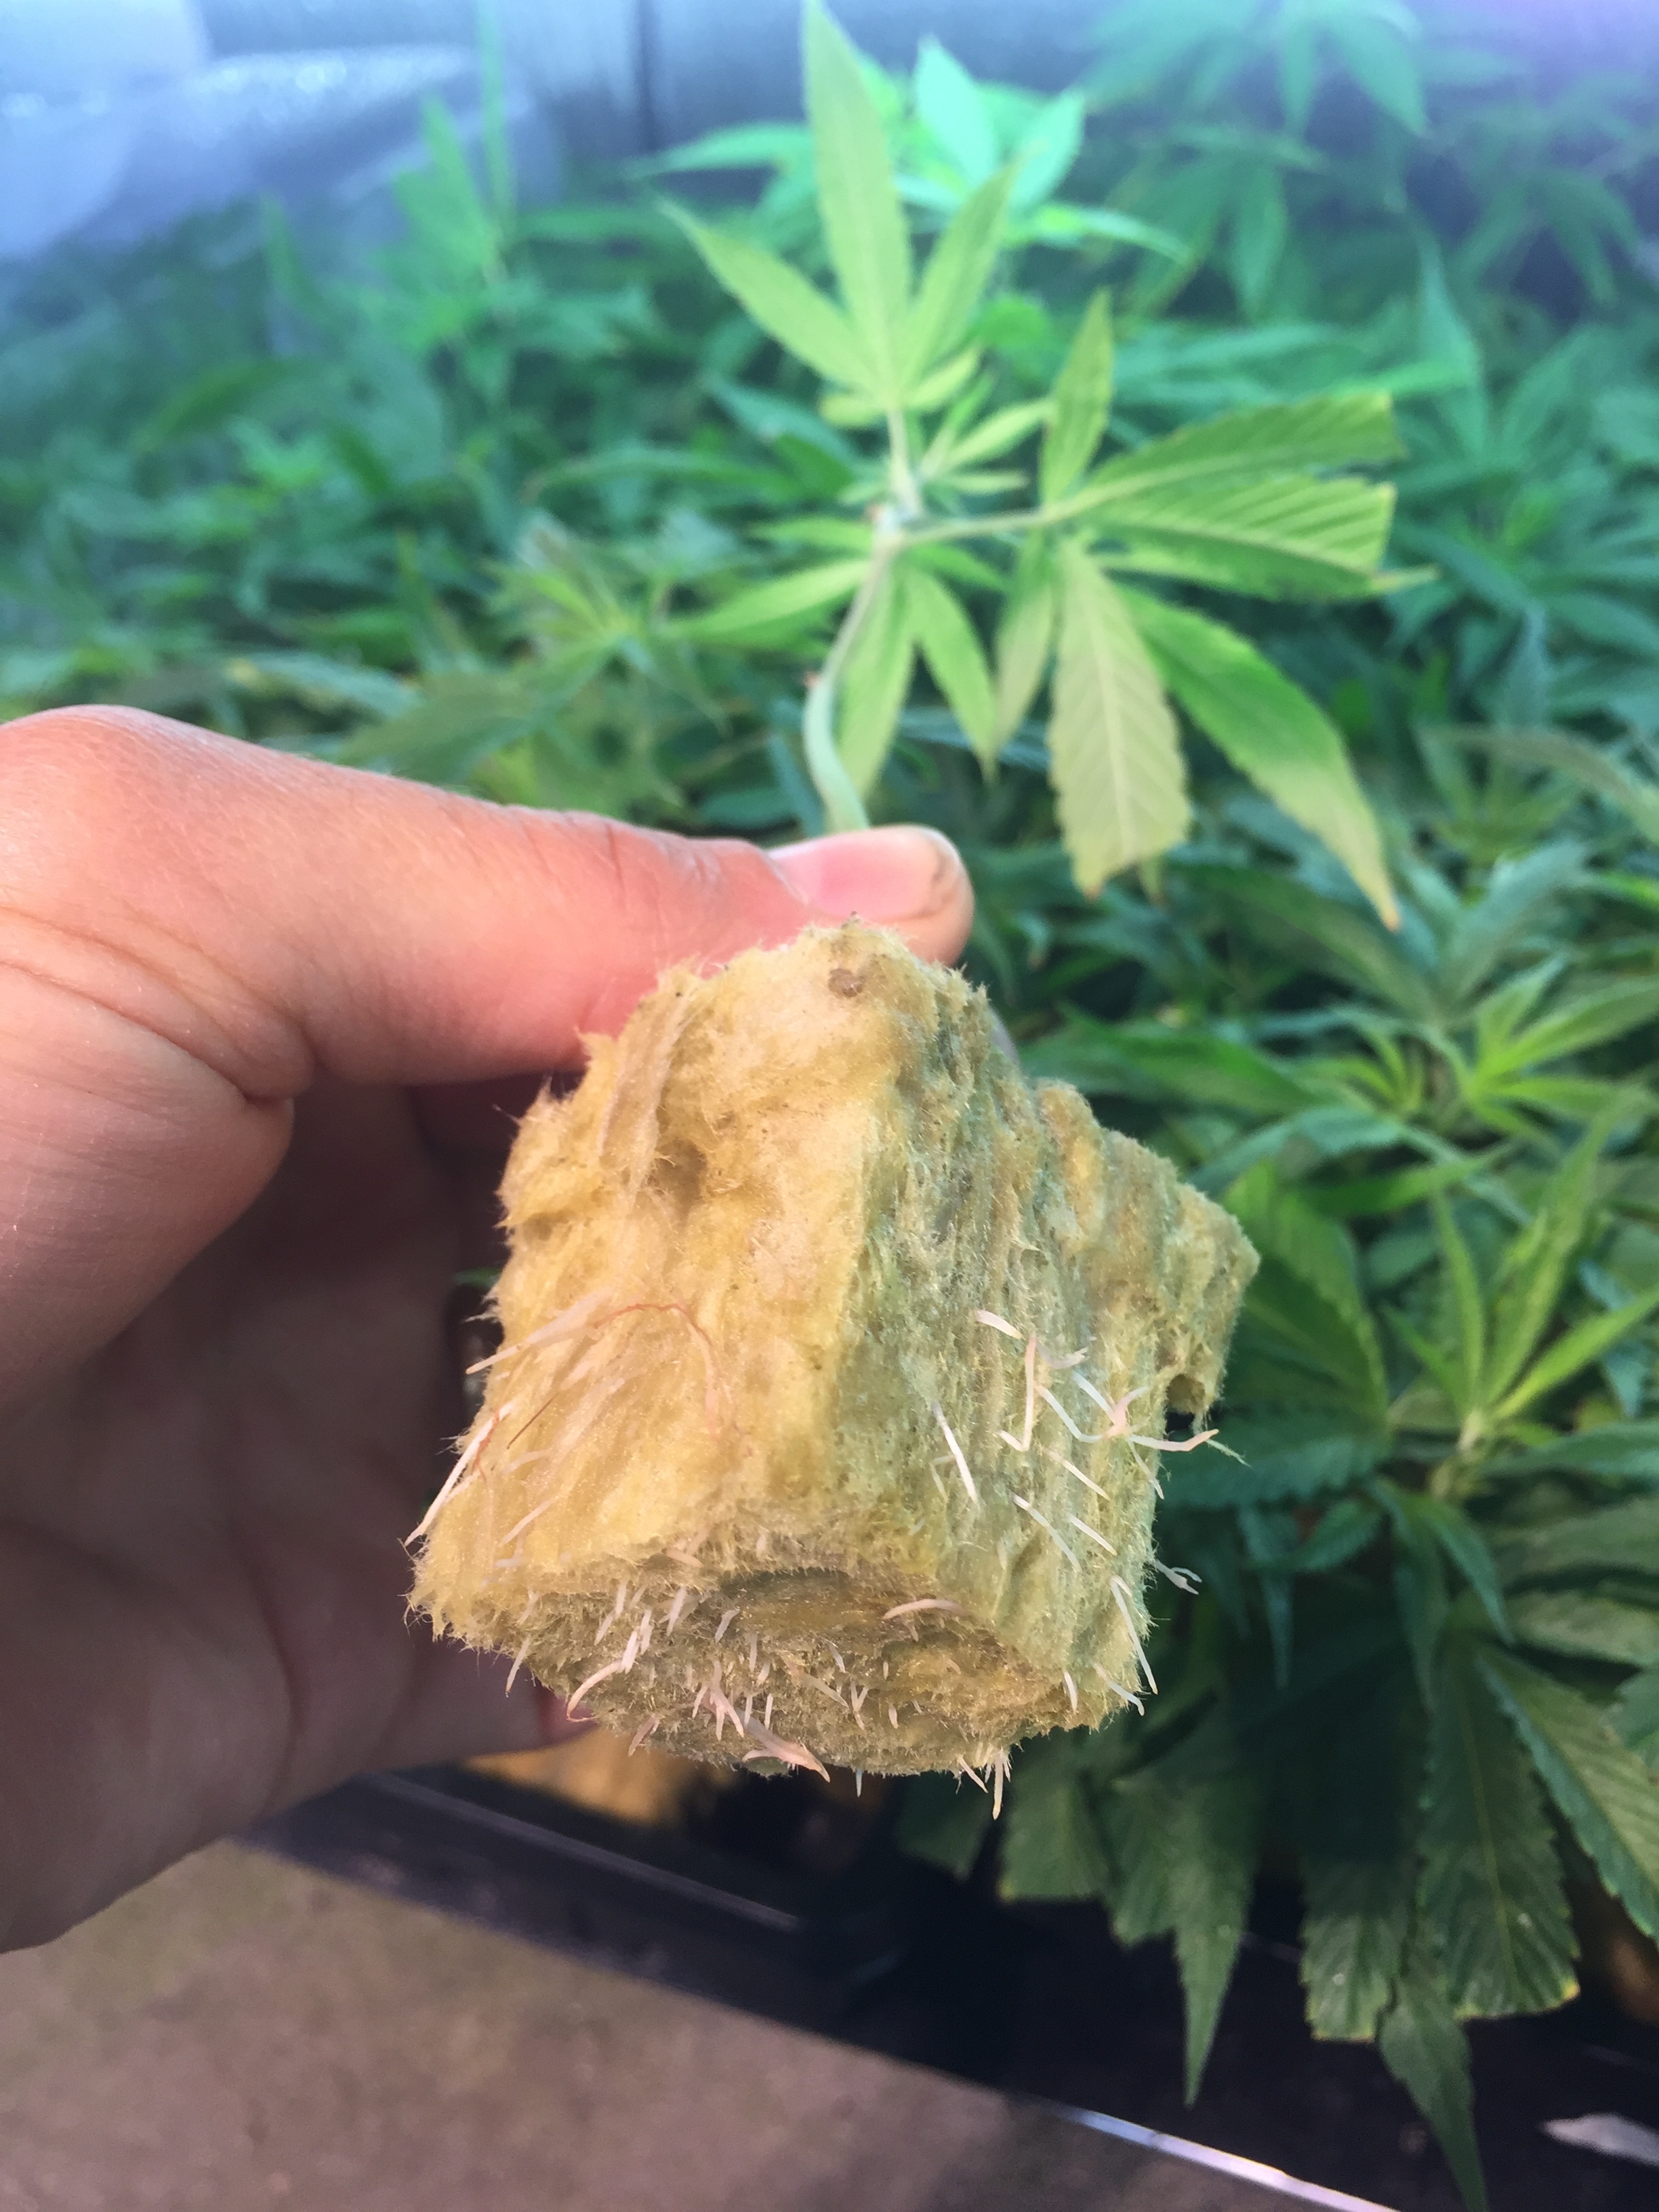
Root pathogens to look for are things like pythium and fusarium. In seed starts and clones, they can cause a condition called damping off. When observing clones, roots may appear rotted or show a significant reduction in mass or root hair production. Pythium, when not properly treated, can rapidly spread in hydroponic systems and can still affect production in soil systems if all the clones are infected.
Pests
We will try to identify the most typical pests that infest cloning operations. They are spider mites, russet mites, broad mites, thrips and root aphids. When performing pest identification, it is imperative that you have a good understanding of what you’re looking at the right magnification microscope for the job. Spider mites and thrips are very easy to spot on the leaf surface with the naked eye and both leave tell tale stippling and spotting. It’s really easy to see the damage because the browned and dead leaf matter is what they are eating on. Spider mites typically leave sand like dots on a green leaf and thrips have larger white scars with black feces. A 30x magnification lens will be more than sufficient for spider and thrip ID.
Russet mites and broad mites need a much higher magnification microscope for proper ID. Typically you will need a magnification of at least 100x but preferably 300x. You can find various models at a reasonable prices on Strainly.
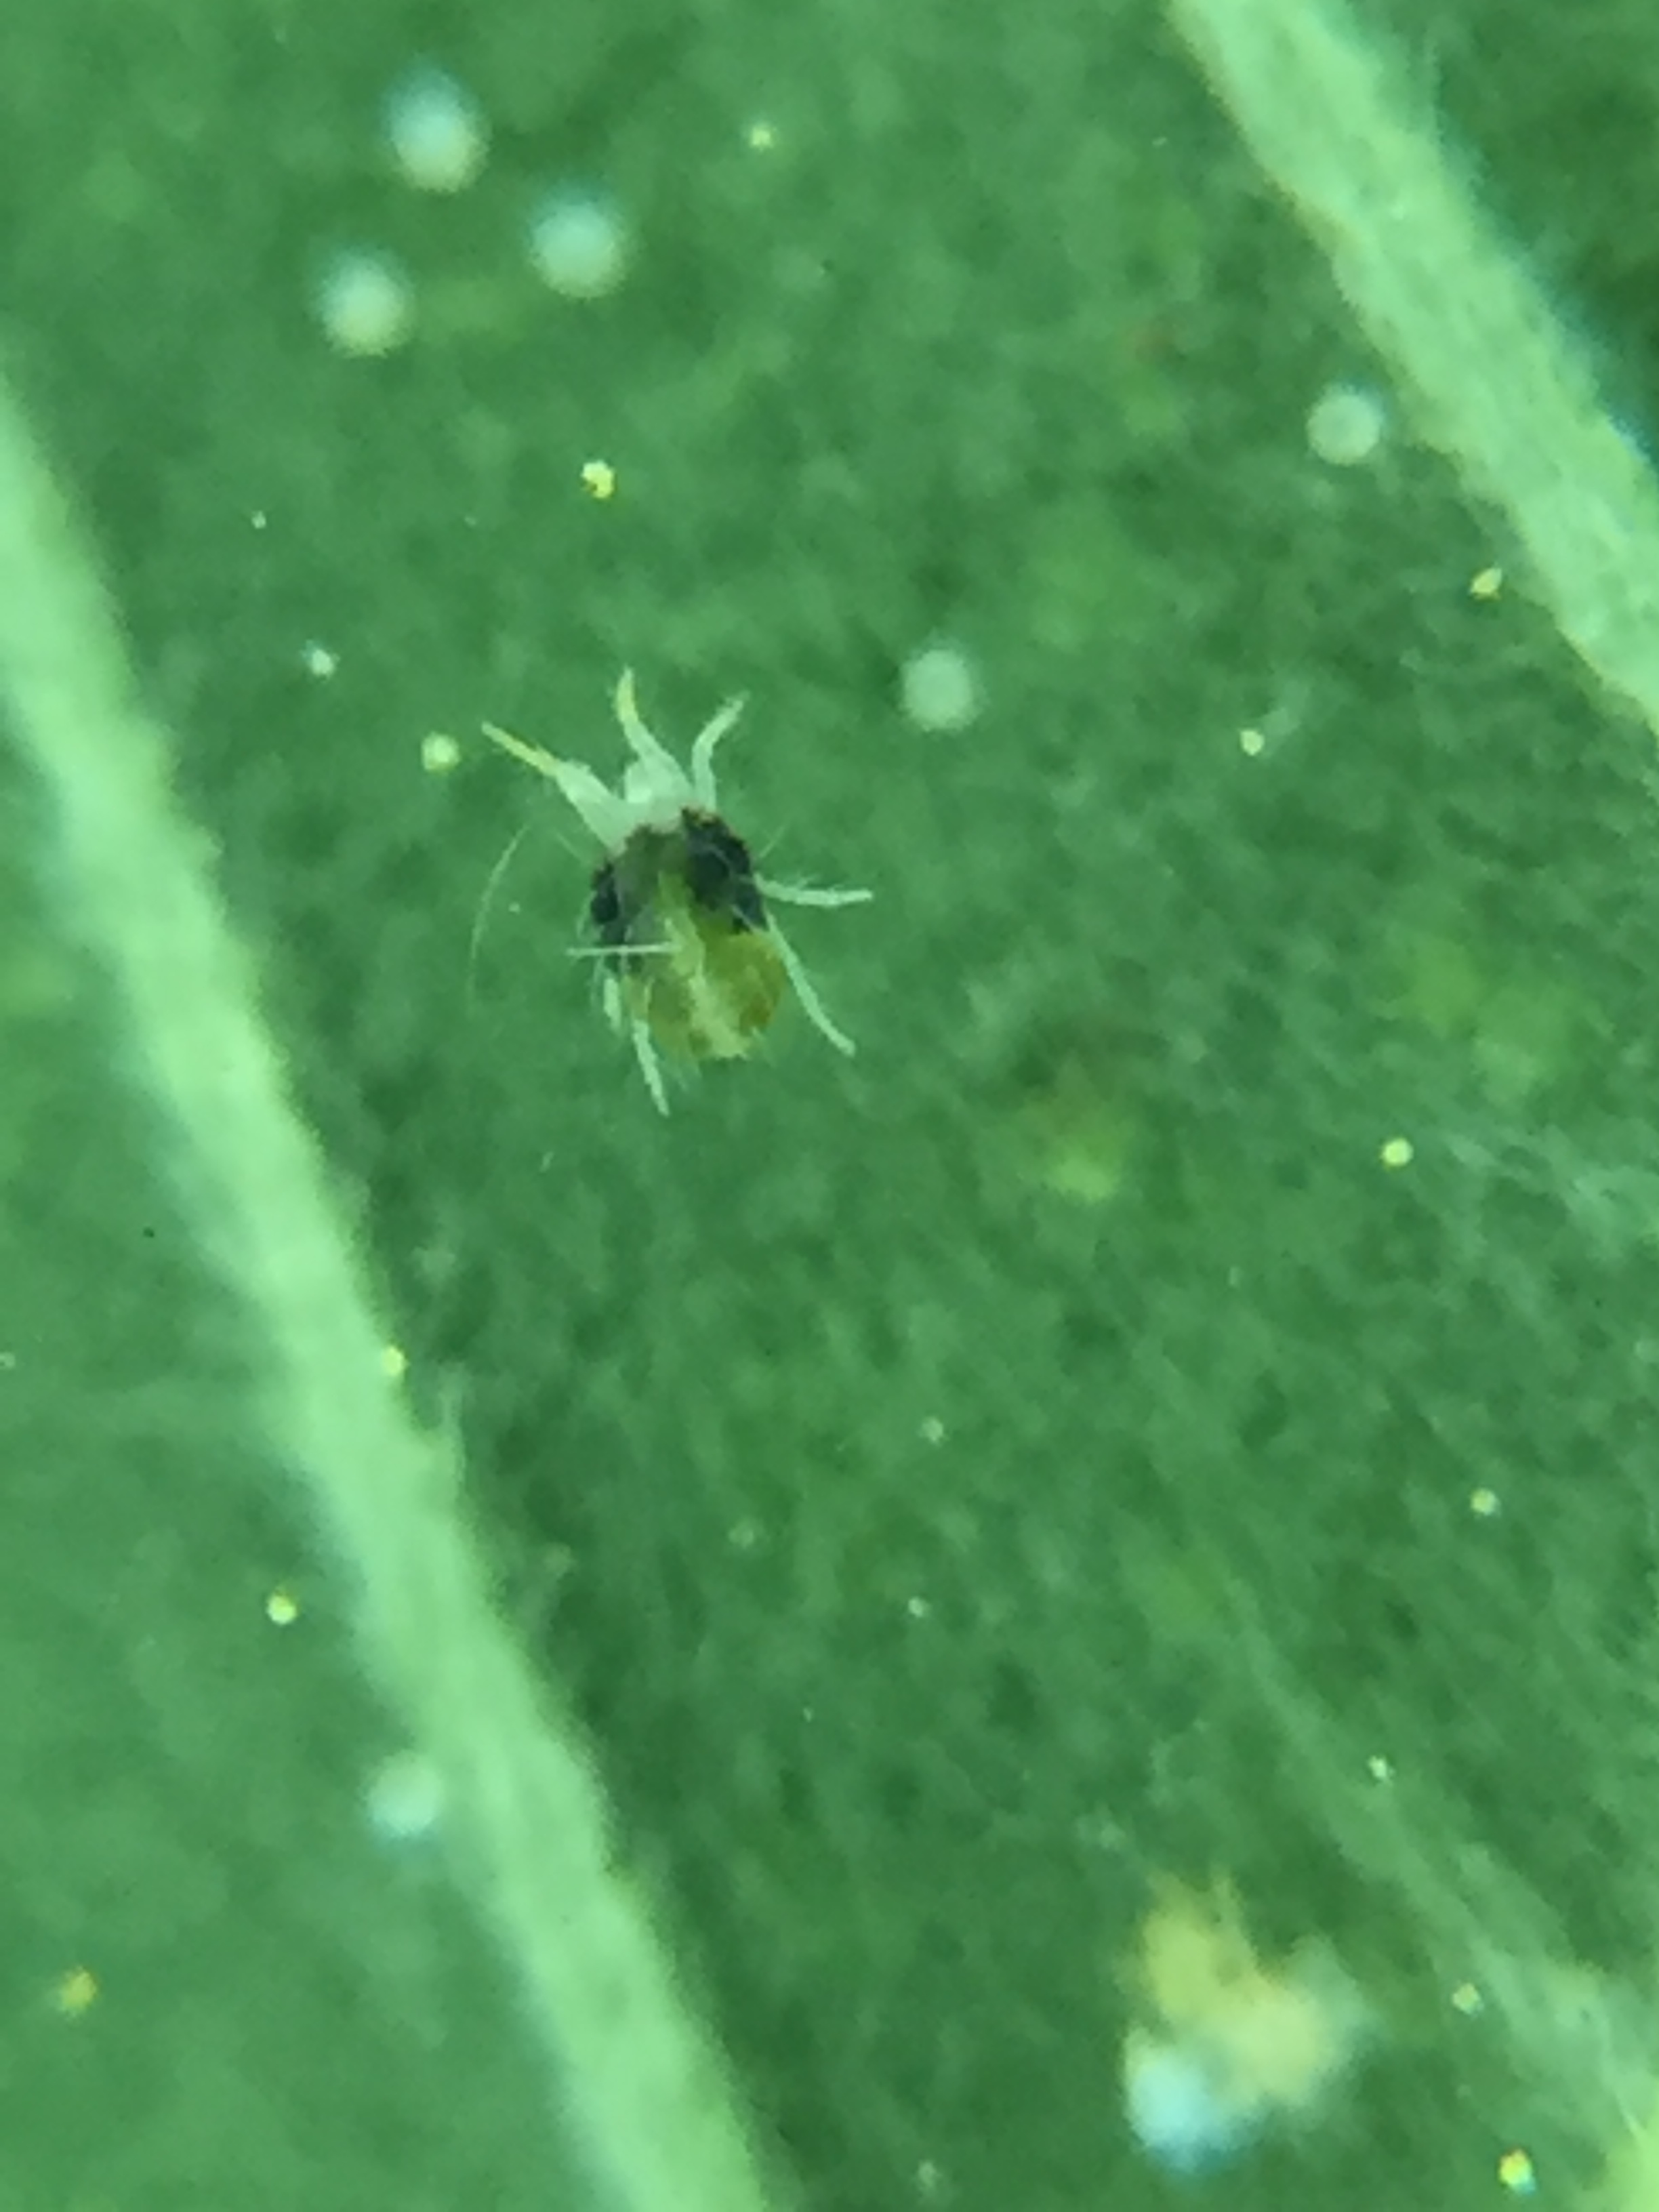
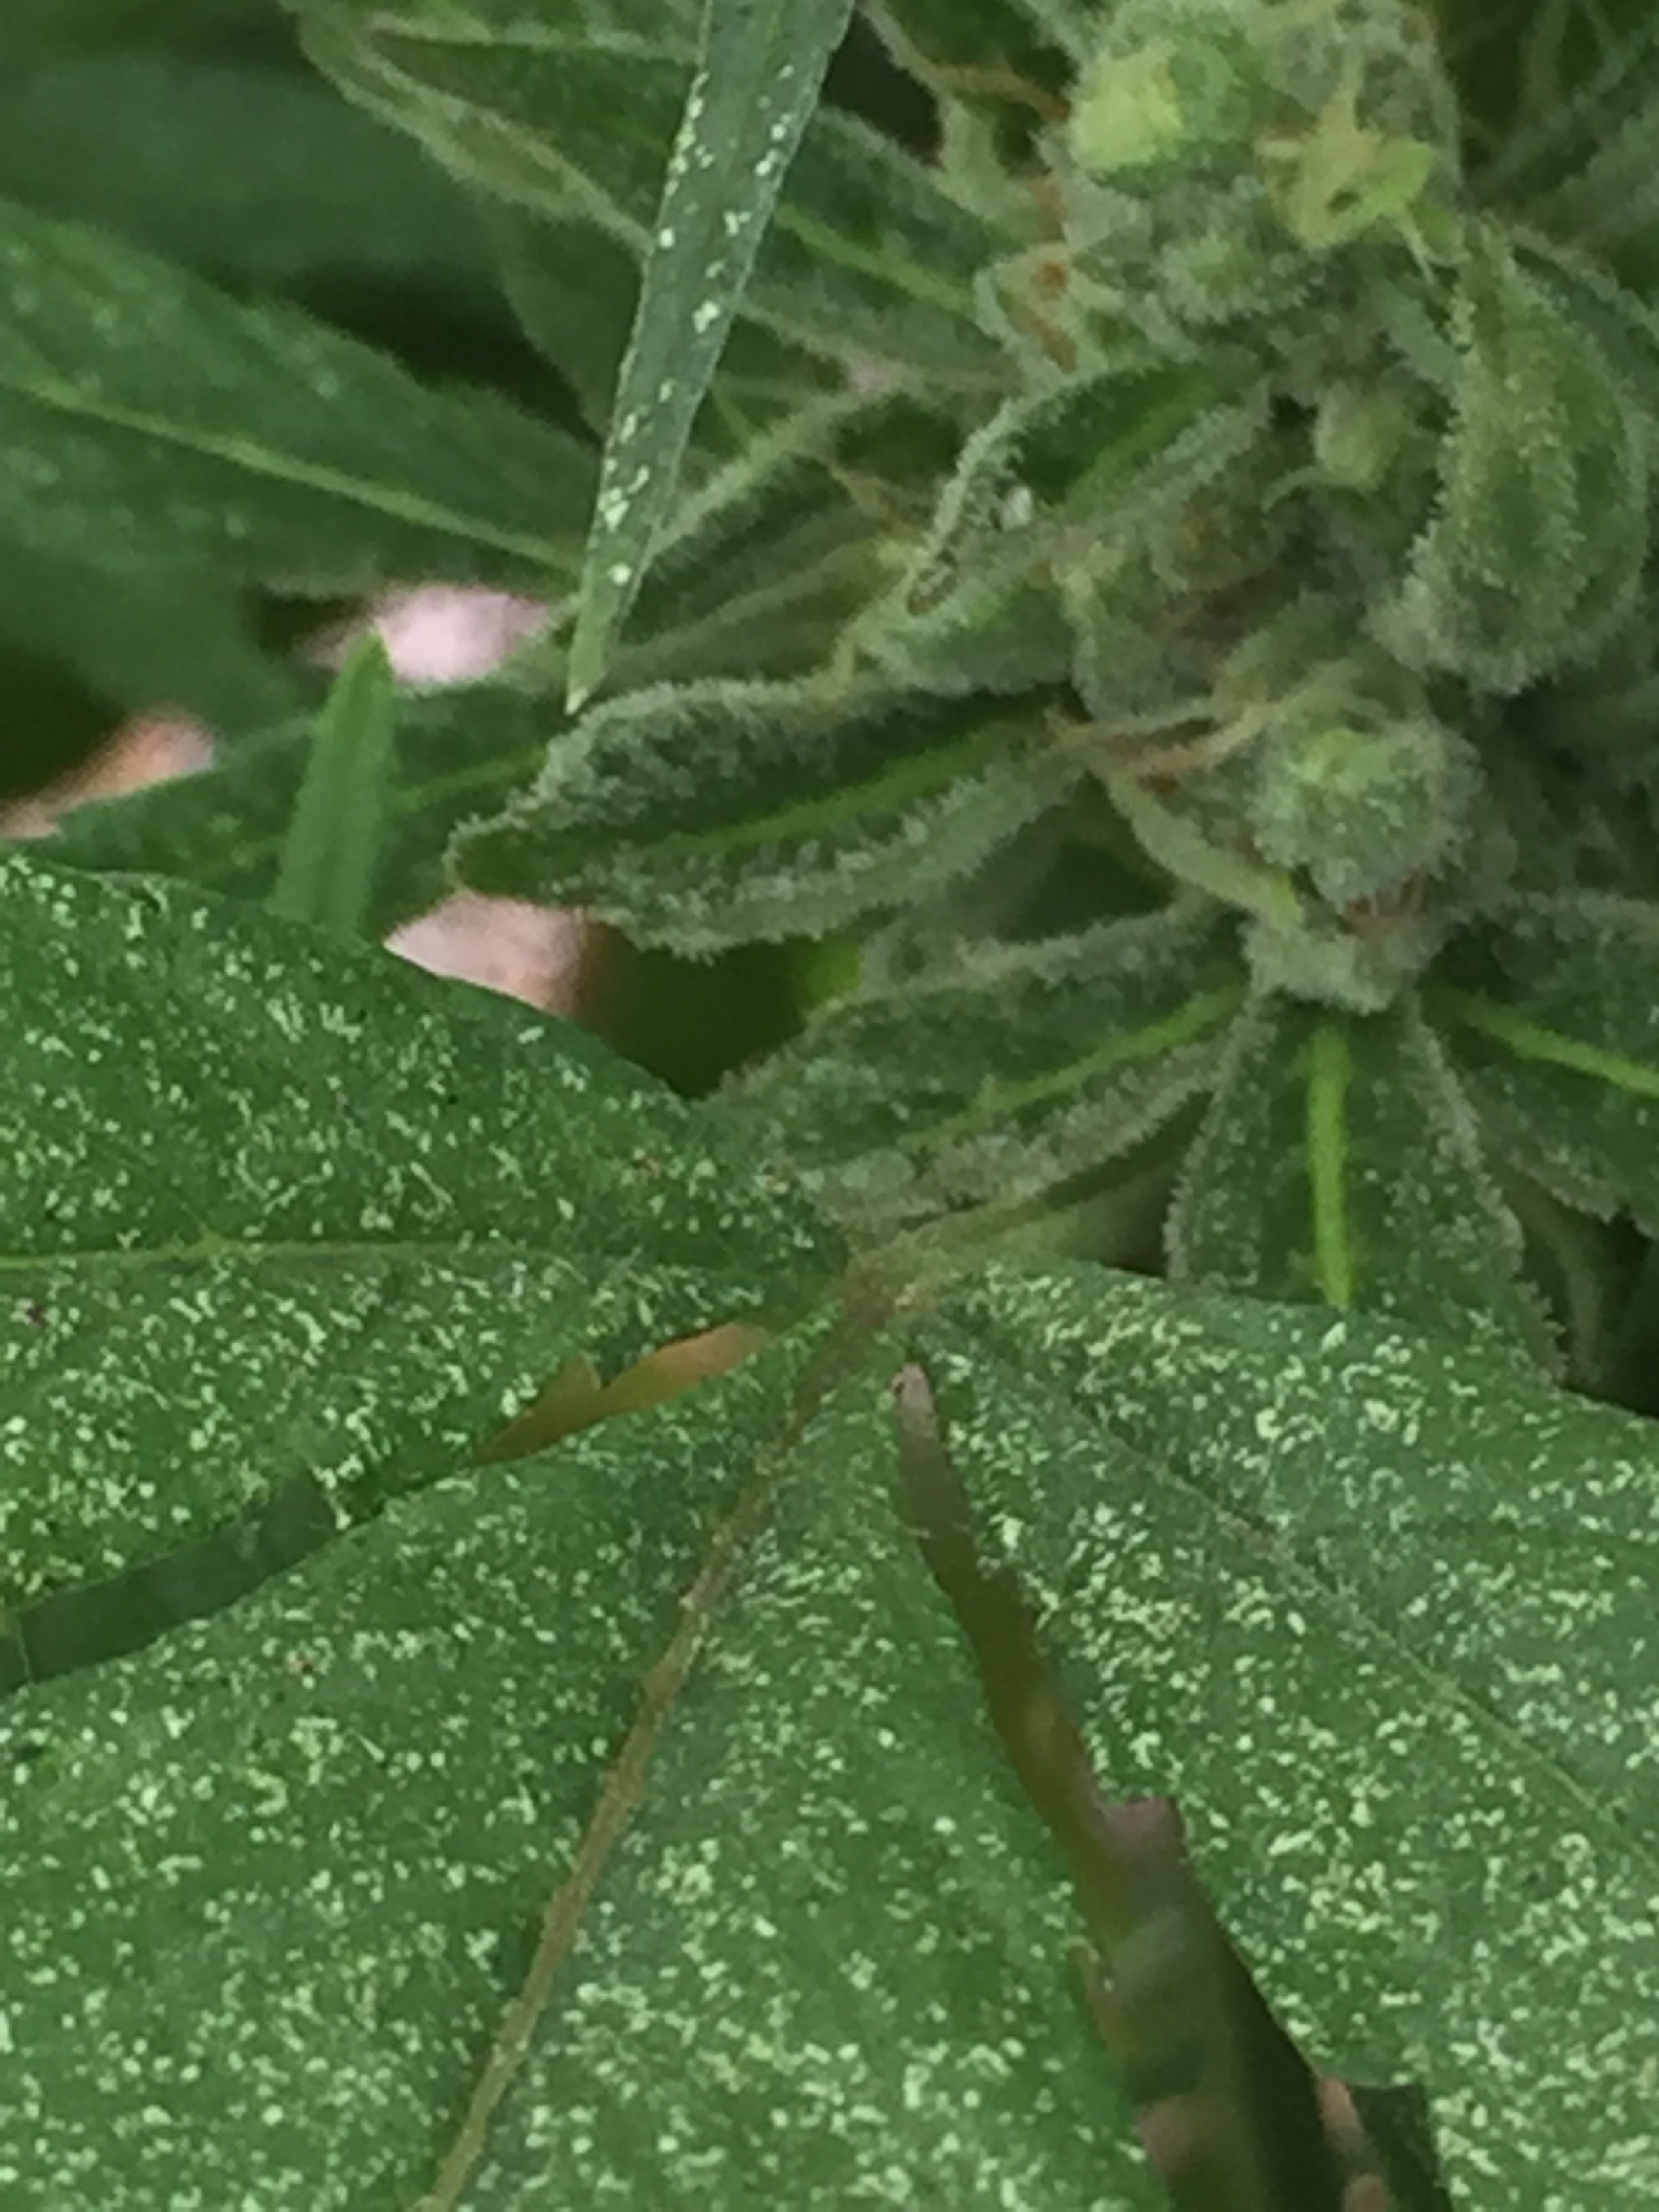
The first step though, is to know how to look for the signs on the leaf surface that would indicate a problem. Russet mite damage will cause the leaves to begin curling upwards at the edges, like a taco. Russet mites themselves have an elongate body and are pale in color. Adult broad mites are pale white to almost translucent in color and they have hind legs that are somewhat threadlike in appearance. Broad mite damage may make the leaves appear to be strap-like or cup downward.
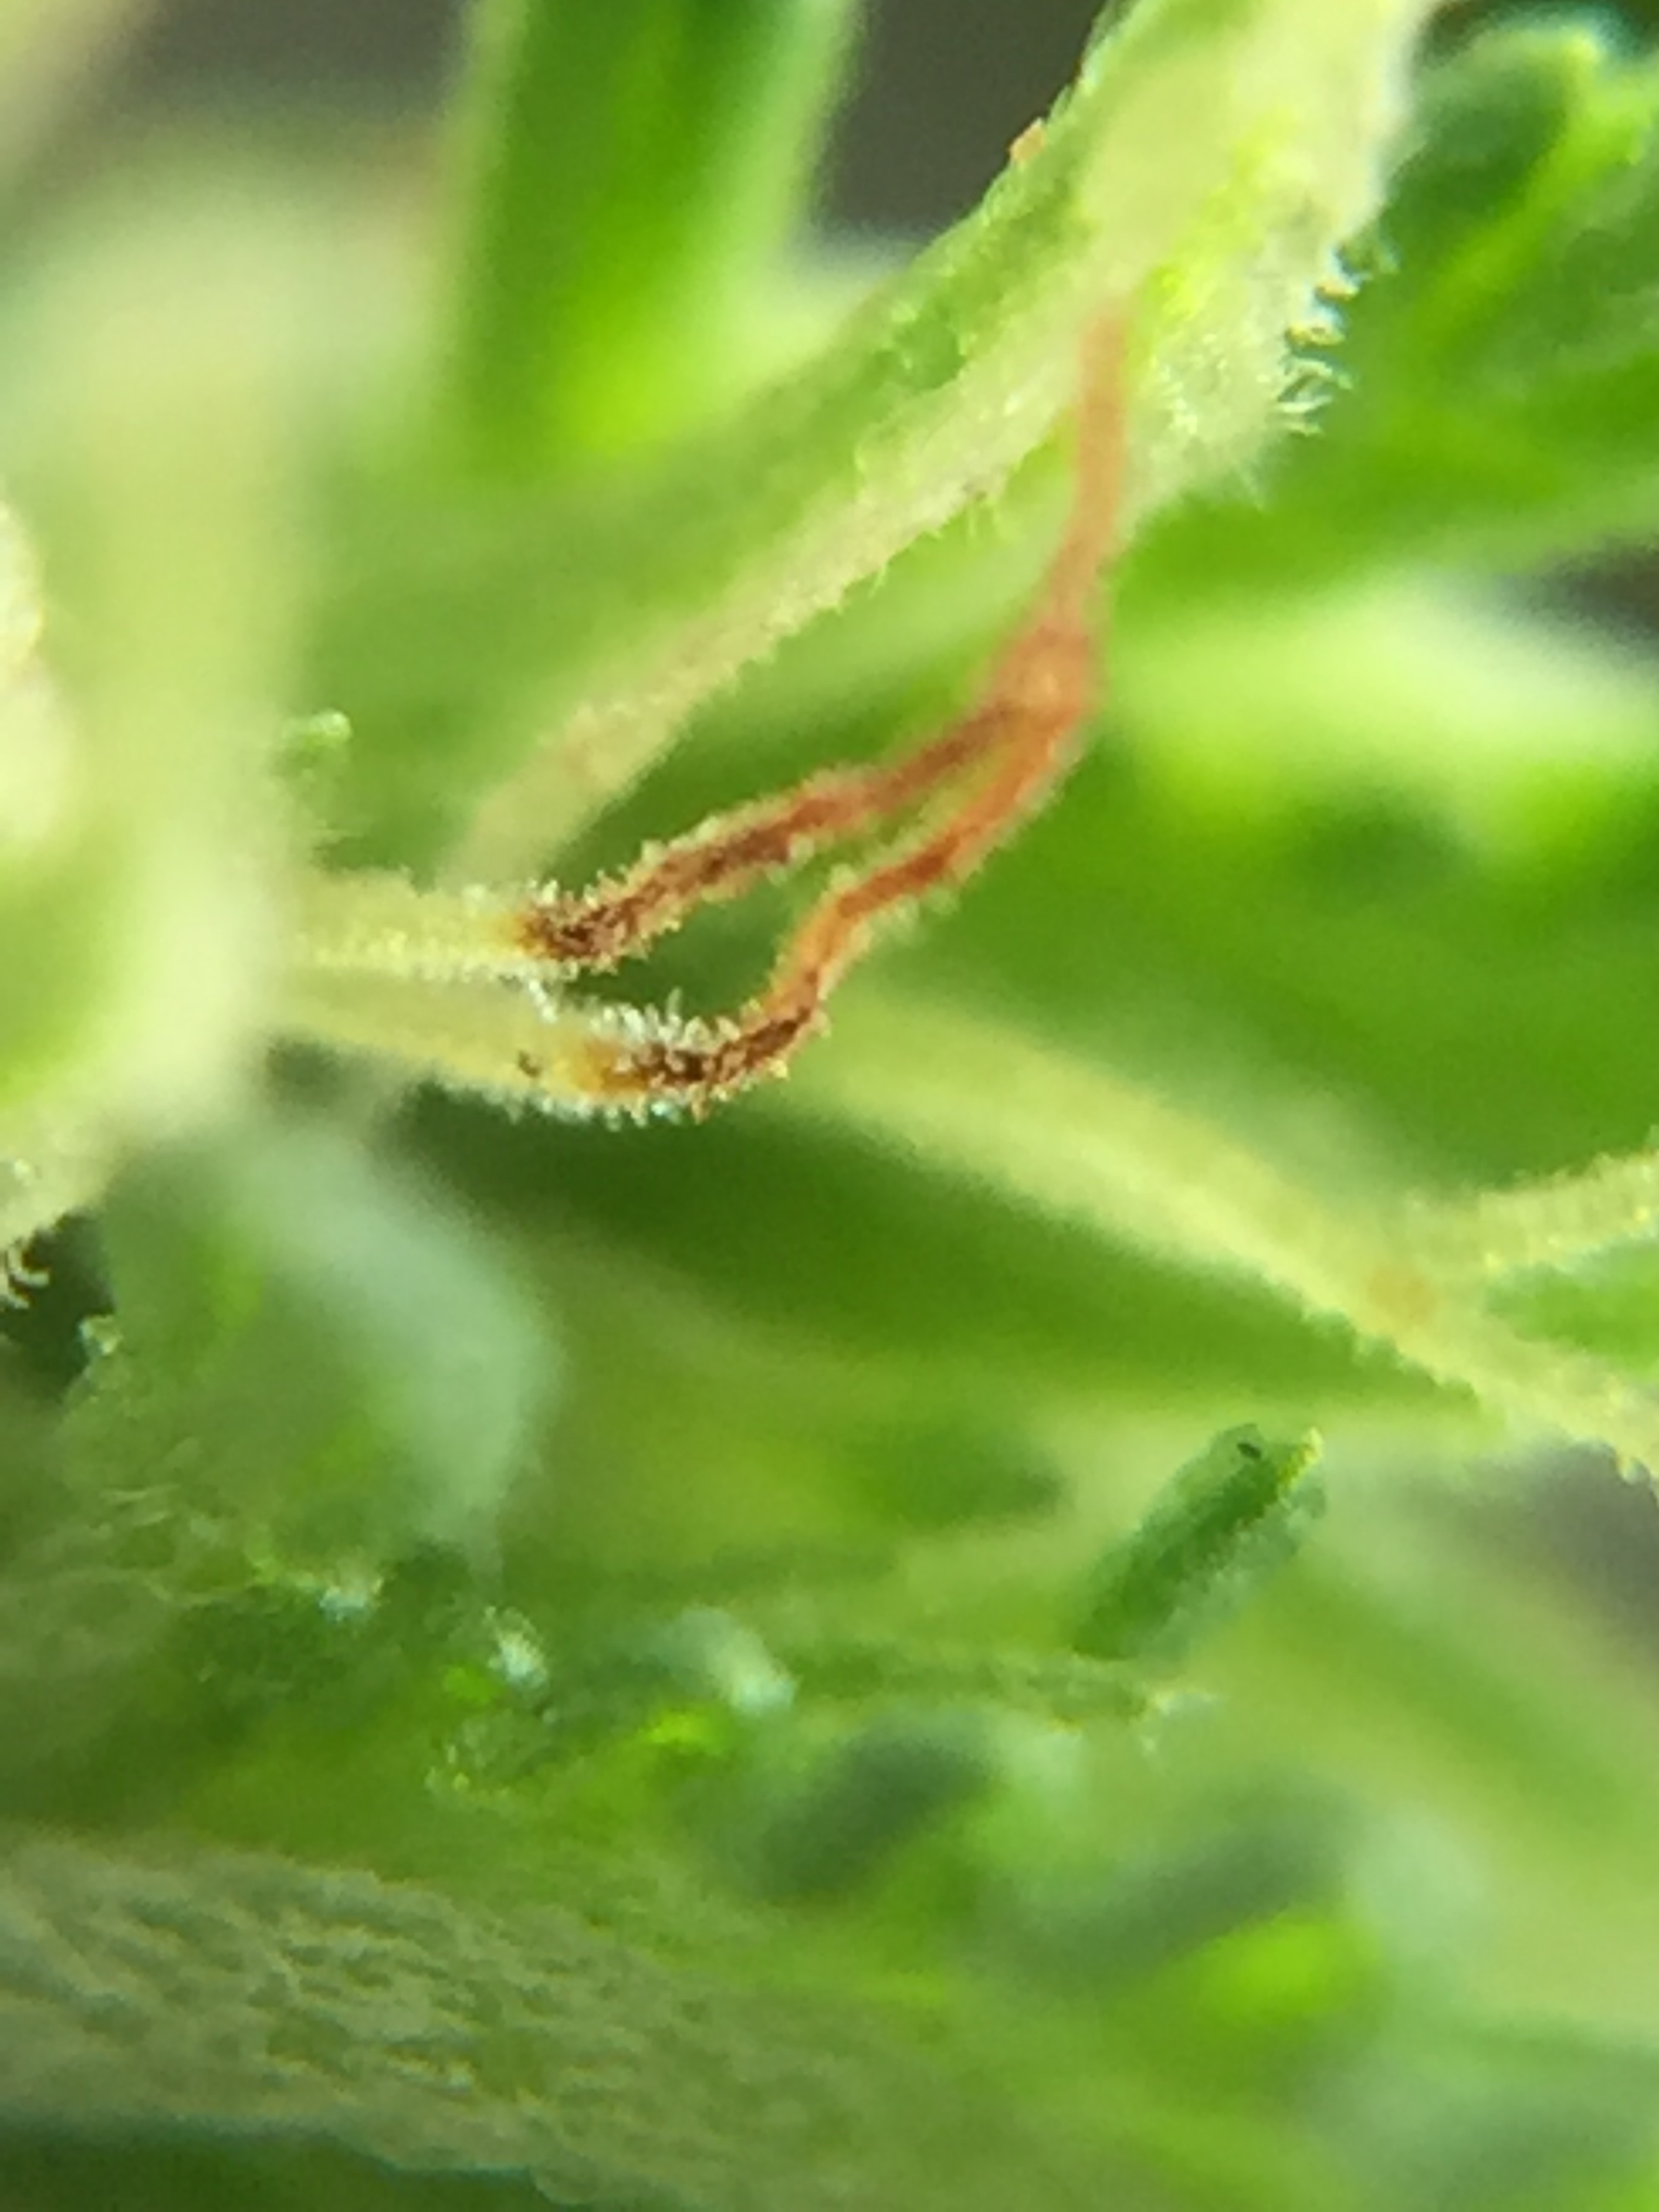
Broad and russet mites can cause the browning and blackening of the calyxes. On healthy clones the calyxes are typically white. However, browning of the calyxes can also be caused by hot root temperatures from the heat mats and over fertilization, so that is not always a good indicator. Broad and russet mites are very difficult to detect early and that’s why the important axiom of “know your grower” helps you feel better about where your plants are coming from. With broad and russet you want to scan all the clones and look for curling around the leaf edges. Ultimately a decent microscope and ID abilities will aid in you drastically on this quest.
Root aphids are another notorious pest being spread through clone propagation. In their case, they can easily be identified with the naked eye on the roots. They can be white, yellow, brown green or black in color. All you have to do is pull up a few clones out of a tray to get a representative sample and scan the root 360 degrees and look for little aphids. A 30x magnification lens might help but is not necessary. Root aphids are notorious causing much headache and confusion because they are underground and typically not identified. That is why it’s important to catch them on the clones first. Because they eat the roots, they leave openings for pathogens to infiltrate.

Summary
When choosing clones and seeds, please spend some time asking the grower questions. You should be able to ask them, have you ever dealt with russet or broad mites? If they stutter or make up excuses like, you should be wary of dealing with them. You shouldn’t feel rushed or threatened to “hurry it up” when dealing with third party clones. The best advice is to find clones with lush green leaves and vibrant white roots. One final element to ask the grower is if they have sprayed their plants with banned or systemic pesticides or fungicides like eagle 20. Certain systemic chemicals can remain inside the plant tissue from a clone all the way through flowering!!! For commercial growers this can mean failed tests even if you’ve never sprayed anything. For home growers this means you might be smoking harmful pesticides unknowingly. The clone producer should always be willing to tell you what their using for pest and pathogen control.
You should always consider having your clones quarantined for a few weeks from your other plants if you have any doubt as to the cleanliness of the clones. This will give you time to run the proper pest management protocols to clean them up. Whether it be inoculating with beneficial biology, introducing predator mites, or simply spraying heavily with organic controls, do your due diligence and properly treat your plants to prevent any spread of infection. Trading seeds and clones can be a fun way to facilitate the breeding of new genetics and proper ID and plant management can save you a lot of headaches in the long run. As always, KNOW YOUR GROWER!!!
2 thoughts on “How to Inspect Hemp Clones for Pests and Pathogens?”